"Interesting stuff of the Technology, Products and Web 2.0..."

Showing posts with label Blogger. Show all posts

Thursday, June 04, 2009

Who Says Blogger.com Doesn’t Have Good Blog Theme ?

Blogger Many people prefer wordpress for blogging platform just because they have a rich set of blog themes and community where one can find lots of free wordpress themes/templates ranging from comic to gadgets and sports to newspapers themes. People always complain that Blogger.com doesn’t have good theme for blog. Well, to help blogger.com users, Rick Klau, product manager for blogger team at Google, asked readers to suggest good third party templates for blogger.com. And there are the rich blogger.com templates for you.

blogger themes

  • BTemplates. A free directory of user-submitted templates, classified by type and/or features.
  • The Cutest Blog on the Block. Run by Becky and Ashley of 2 Moms Talk, this site offers free, premade layouts, as well as customizable backgrounds.
  • Blogger Styles. Gallery of submitted templates, ranked by visitors and includes detailed configuration instructions.
  • FalconHive. Conversions of WordPress templates upon request, along with archive of past conversions.
  • All Blogspot Templates. Templates in 1-, 2- and 3-column options. Also includes AdSense-ready templates.
  • Zona Cerebral. Spanish site with dozens of templates to choose from, including several converted WordPress themes.
  • Quite Random. A number of free templates, and several Blogger-specific tutorials regarding setup and layout editing.
  • ChicaBlogger. In Spanish, templates designed primarily for women.
  • Deluxe Templates. Hundreds of templates, including many converted WordPress themes. Also has a nice "tips & tricks" section for customizing Blogger.
  • Pyzam. Thousands of templates, browsable by category and sortable by recency or popularity.
  • Our Blog Templates. 160+ free templates, all well-labeled for easy browsing to find the one you want.
  • eBlogTemplates. Combination of free and premium templates, and a wealth of tips for tweaking your Blogger blog.

Note: for the most part, sites above provide templates for Blogger's "Layouts". If you still see a "Templates" tab for your blog, you need to upgrade your blog to take advantage of these new features. This help article has some more information about using Layouts.

Finally, cheth shared a recent post he wrote where he finds his favorite templates (many taken from the sites above). It's a good overview, and gives you a good visual indication of just how varied Blogger templates can get.

Make sure you should download the current template and put it in a safe place, before making any changes to your current template (Click "Layout", then "Edit HTML" and then "Download full template".). Blogger cannot provide support for independently created templates. If you choose to use a template built by someone else, make sure to figure out how easy it is to reach them if problems arise.

Monday, June 01, 2009

Search Box Gadget Came Out Of Draft Version of Blogger.com

Blogger.com today announced that the Search Box Gadget is now out of draft version  and it is available to everyone. With this gadget, your readers will be able to search not just your posts, but web pages linked from your blog, your blog list, and link lists.

To add the gadget, go to your blog's Layout page, then click “Add a Gadget” and click on “Search Box.”

image

Configuration is easy: just select which elements you want your readers to be able to search.

It now provides simpler defaults, picks up your blog’s style and colors, integrates more tightly with your blog, and allows you to configure search across specific blog lists (in addition to link lists) The gadget uses the AJAX Search APIs to provide a tightly-coupled inline experience, and creates a Custom Search Engine for your blog that automatically updates when you update your blog, blog lists, or link lists.

Friday, March 13, 2009

Blogger.com Made Mobile Posting Easy

image Blogging through mobile is not something new. Blogger.com already has several ways to post via a mobile device. However with the last release to Blogger In Draft, its a lot easier to set up mobile posting to your blog via SMS, MMS, and email.

If you already have a blog on Blogger, you can configure mobile posting by going to your Blogger Dashboard on draft.blogger.com.

Enable SMS or MMS for your mobile device by clicking on the gray phone icon next to your blog name.

It'll show you a claim code that you can send to Blogger via SMS or MMS to register your device and link it to your blog.

Once you've registered your device, you're done! Messages you send to BLOGGR (256447) will be posted to your blog. Note: SMS posting on Blogger currently does not work with T-mobile devices.

To enable Email posting to your blog, return to your Blogger dashboard and click on the gray envelope icon. You'll see a dialog that prompts you to define a secret email address.

Emails you send to this email address will be posted to your blog. Include a photo in your post by sending it as an attachment. Blogger will insert the photo between the title and the body of your post.

To edit your Mobile settings, you can click on the phone or envelope icons on your Blogger Dashboard, or go to the Settings > Email & Mobile tab.

If you are away from your computer, but want to create a blog on-the-go you can also create a blog directly from your mobile device. Follow these instructions to create a blog from your phone and claim it later.

Please note that SMS posting is not yet available for T-mobile devices.

Check new features available in Blogger in Draft.

Sunday, February 08, 2009

Add “TweetThis” Button To Your Blog

As you know, twitter is growing very rapidly and there are lots of applications coming every week built using twitter APIs. Twitter becomes a good platform for promoting your blog as well as products. In order to help bloggers, i today wrote this script which adds “TweetThis” button to your blog.

This looks like below :

image

This will allow your blog readers to tweet about your blog post.  I uses APIs from TinyURL to make sure your long blog post url shrink to smaller size to fit into the 140 characters limit. The tweet format will be as below:

Post_Title-TinyURL

TinyURL is url of your blog post after shrinking.

What You Have To Do ?

Just add a small java script code your your blogger.com blog. Go to your blogger.com account. Then click on “Layout” option. Then click on “Layout” tab. Click on “Add a Gadget”. Then select “HTML/JavaScript”. See the steps in below image :

image

Copy – Paste below javascript code and you are done.

- - - - - - - - - - - - - - - - - - - - - - - - - - - - - - - - - - - - - - - - - - - - - - - - - - - - - - - - - - - -

<!-- Begin tweetthis script code -->
<script type="text/javascript">
pTitle=document.title;
document.write('<div id="tweetthis" style="float:left; height: auto; width: auto;"></div>');
</script>
<script src=http://smashingfeeds.com/tools/tweetthis.js type="text/javascript"></script>
<!-- End tweetthis script code -->

- - - - - - - - - - - - - - - - - - - - - - - - - - - - - - - - - - - - - - - - - - - - - - - - - - - - - - - - - - - -

I am not sure about other blogging platforms(wordpress, typepad, etc…).

Possible Advantages

  • Increase your blog visibility
  • Increase subscriber counts
  • More followers
  • More Traffic
  • Increase monthly revenue

If you like this script, then feel free to follow me on twitter @blogfisher

Thursday, December 11, 2008

Import/Export Feature of Blogger.com Came Out of Draft

Blogger.com was testing import/export blog feature and it was available under draft version till now. However with yesterday’s announcement, this feature is now came out of draft testing ground. The import/export feature opens up a whole new range of portability for your blogs, as well as allows for a few new options in the blog creation process.

Couple of ideas that can be done with importing and exporting:

  • Merge two or more blogs into one. Have a few scattered blogs and want to get a fresh start? Now you can combine comments and posts from multiple blogs into a brand new blog.
  • Move individual posts from blog to blog. Cross-publish your posts on multiple blogs, or transfer large batches of posts from one blog to another with a single click.
  • Back up your blog to your own storage. It's never a bad idea to create backup copies of your own content, and now you can easily export an archival copy of your blog to your hard drive with a simple tool.
  • Move your blog somewhere else. Our standard Atom XML export format will open up new blogging channels between providers, and let you take your content with you should you decide to move somewhere else. And of course, if you decide to come back to Blogger, importing your export file will get you back up and running in seconds.

You can access Import and Export from the Blog Tools section on the Settings | Basic tab.

image

There is a new importing options to the blog creation process:

For some more detailed info on all of the things you can do with Import and Export, please check out accompanying help article.

A couple caveats

  • Currently it supports importing only Blogger blogs. Importing from WordPress, Typepad, LiveJournal or any other blogging platforms is not supported.
  • Before importing a blog for the first time, it is recommended that you create a new, throwaway blog to import into so you get a sense for how the process works. Once you’re comfortable, import into your public blog.
  • If you have enabled a content warning for your blog, then you will have to remove it before your blog can be exported.

Friday, November 07, 2008

Blogger.com Helps You to Know View Of Your Blog Readers With “Reactions”

image Most of the bloggers are interested in knowing what readers think about blog post. To help bloggers, blogger.com introduced a feature called “Reactions”.  Reactions make it easy for authors to get feedback on their content. It’s a simple annotations chosen by authors and given by readers.

With Reactions, readers can easily respond with one click, increasing feedback on posts.

To enable Reactions, log in to your dashboard, go to Layout > Page Elements and click the Edit link in the Blog Posts element to open the blog post configuration tool. Then, check the box next to Reactions, edit your reactions as a comma-separated list, and click Save.

Reactions works with Layouts templates, though if your template is heavily customized, you may have to reset your widget templates for Reactions to appear. If you have a Classic template you will need to switch to Layouts to use Reactions.

Thursday, October 23, 2008

iGoogle Gadget Makes Blog Publishing Easy for Blogger.com Blog Owner

Blogger.com announced that they are releasing Blogger Post Gadget for iGoogle. Now you can edit and publish posts directly from your custom iGoogle homepage, making it even easier to share your thoughts with the world.

To get started, just click here to have the Blogger Post Gadget added to your iGoogle page.

You can use HTML in the text box, but if you want more rich text editing — for example, to upload a photo — just click “Save Draft” and you’ll get a link to edit the post in the full Blogger post editor.

Tuesday, September 30, 2008

Bloggers Can Display Their Latest Comments On Their Blog Using BackType’s New Widgets

To keep your readers up-to-date with comments you're leaving on the web,image BackType, a service that lets you find, follow and share comments from across the web, has released two widgets for bloggers and other website owners. These Widgets let you feature comments on your blog or other websites with a single line of HTML.

Both widgets are stretch-to-fit, designed to fit in the sidebar of a  blog. For those who want to change the appearance or contents of the widgets, you can easily do so with a few lines of CSS.

Here are the widgets that are available:

  • My Latest Comments : Displays comments from your profile.
  • My Shared Comments : Displays comments from your shared comments page.

Visit the widgets page to learn more, or login and learn how you can add widgets to your site with a single line of HTML.

Sunday, August 31, 2008

Blooger.com Now Allows You To Know Who Follows Your Blog

Would you like to know who enjoys reading your blog? Or stay updated with your favorite blogs right from your Blogger dashboard? You can do those things and more with Blogger’s new Following feature.

By following your blog, your readers tell you and the world that they’re a fan of what you post. Your Dashboard now shows you how many followers each of your blogs has. With a click on the Followers icon, you can browse your followers, see what blogs they write, and read the other blogs they’re following.

Now that you know who your Followers are, you can show them off by adding the Followers gadget to your blog’s sidebar. From the “Layout Page Elements” tab, click “Add a Gadget” and select “Followers” from the gadgets list. The Followers gadget shows the profile pictures of your followers and gives your readers a “Follow This Blog” link to join up, too.

Your followers can stay updated with your blog with the Reading List that have been added to the Blogger Dashboard. The Blogs I’m Following tab automatically shows the latest posts from all the blogs you follow. You can follow any blog from your reading list, even blogs that haven’t added the Followers widget or aren’t hosted on Blogger. Just click the “Add” button and type in the blog’s URL.


If you’re aGoogle Readeruser, you’ll now see a special folder in Readercalled “Blogs I’m Following,” full of the subscriptions for all of the blogs you follow. You can follow blogs you’ve subscribed to in Reader, too: From the Reading List on your Blogger Dashboard, click “Add,” then “Import from Google Reader.”And.... there's more to come! We are also in the process of integrating with Google Friend Connect so you can give your readers more engaging social features.

For more details about what we've launched, check out the help articles here:
What is Following?
How do I add the Followers gadget to my blog?
How do I use the Blogger Reading List?
Following a Blog Publicly vs. Anonymously

Friday, June 27, 2008

Blogger.com Rocks With the Introduction Of Lots Of New Features

Blogger in Draft, a draft version of blogger.com, has released lots of new features yesterday that will surely rock your blog. Below is a list of all new features that they released.

1. Star Rating

With this new Star Ratings feature, your readers can easily rate your posts — or the things you post about — from one star to five stars with a single click, right from the post footer.

Think of Star Ratings as a mini-poll for each of your posts. If you blog about fashion, food, crafts, quotes, or art, this will be particularly useful to you.

To enable Star Ratings, log it to http://draft.blogger.com/ and go to your Layouts page. From there, click the “Edit” link for the Blog Posts page element and then check the “Show Star Ratings” checkbox.

You can customize the location of the stars within the post by dragging the preview around in the “Arrange Items” box.

Notes

  • This is a Layouts-only feature. If you’re using a Classic template you’ll need to upgrade to Layouts to add Star Ratings.
  • The star ratings widget should blend seamlessly with most solid-colored blog backgrounds (one exception is Rounders, where the edges of the widget will be visible via a color change). The text and background colors for the ratings are taken from the following skin variables:
    • Foreground: textcolor, textColor
    • Backrgound: mainBgColor, bgcolor
  • If you have customized your blog widget’s template you may not see the Star Ratings. You will need to either reset your blog widget’s template or copy the Star Ratings code from a fresh template.

2. Webmaster Tools for Blogger

Ever wonder why your blog shows up where it does in the Google search rankings? With this new Webmaster Tools integration that information is just a click or two away.

Webmaster Tools is a Google service that provides you with detailed information about your website’s visibility to Google’s search engine. You can see how often Google’s web crawlers visit your site, find out who links to your site, what searches are used to find your site, and even control how your page appears in the Google web results.

You will find a new link from the Blogger in Draft dashboard to take you directly to Webmaster Tools. If you follow it, blogger.com will automatically add all your blogs to Webmaster Tools and verify them for you. From there, you can poke around and learn about how Google search sees your blog.

You can learn more about Webmaster Tools at Google’s Webmaster Help Center.

3. Embedded Comment Form

Many of us don’t like the existing comment form as 
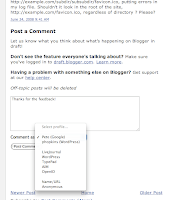
it’s on a separate page from the post, styled in a way that doesn’t match the blog. Well, this new embedded comment form addresses that by putting the comment form where your readers expect it: at the bottom of the post.

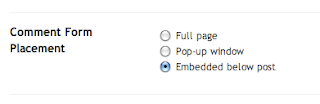
To turn on the embedded comment form, log in to http://draft.blogger.com/ and go to Settings > Comments for your blog. You’ll see that the “Show comments in a popup window?” setting has been replaced with the new “Comment Form Placement” setting. Just click “Embedded below post,” save your settings, and go check out a post to see your new comment form.

Additional Features

  • The comment form works with Google Accounts, OpenID authentication, name / URL, and anonymous identities. As with the current comment form, they’ve set up shortcuts for a handful of common OpenID providers.
  • Once you log in with a Google Account for one blog, you won’t have to log in to comment on other blogs during your browser session. Nevertheless, to protect your privacy, it uses an <iframe> to keep your logged-in identity inaccessible to the blog itself.
  • If you have a “Comment Form Message” set up, it will be put on the post page above the comment form.
  • If you require word verification for commenting on your blog, it will show the word verification form in a small dialog after you click “Post Comment.”
  • The embedded comment form works with Classic templates. The <$BlogItemCreate$> tag will add the right HTML to your page.

Caveats

  • If you’ve edited your template for the blog widget, you won’t automatically pick up the new code for the comment form. You’ll need to either reset the template by deleting the contents of the <b:widget id='Blog1' locked='true' title='Blog Posts' type='Blog'> element (backup your template first!) or copy the code from an unmodified blog. Amanda from Blogger Buster has written a howto post for updating a modified blog widget template
  • The font color of the comment form is currently hard-coded to black. If your template has a dark background, this may make the “Comment As:” label hard to read.
  • The embedded comment form currently does not support subscribing to follow-up comments via email, nor does it have a preview button.

4. New Post Editor

This is a completely new version of the Blogger post editor. This editor is more stable, compatible, predictable, and will help to bring more functionality to posts on Blogger over the coming months and years.

Out of the gate you’ll notice two areas where the new editor improves significantly over Blogger’s current editor: images and raw HTML.

Note: Autosave is currently disabled in the new post editor. It will be turned on in an upcoming release, but for now it’s off. You’ll want to periodically remember to save your drafts when using this editor.

More details about this feature is available here.

5. Import and Export

Now you can export all of your posts and comments into a single, Atom-formatted XML file for easy backup. You can then import the posts back into Blogger, either into an existing blog or into a new one.

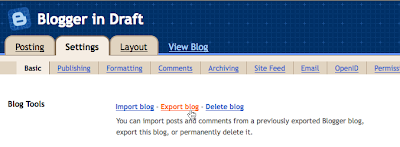
To export your blog, log in to http://draft.blogger.com/ and go to the Settings > Basic page. You’ll see the Blog Tools links at the top of the page for importing and exporting.

Once you click “Export blog” and press the “Export” button on the 
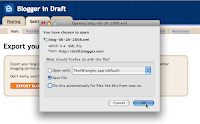
next page, your browser will prompt you to save the XML file for your blog. Keep it somewhere safe as a backup, or import it into a different blog. You can import one blog into another from the Blog Tools links, or when creating a new blog. Look for the “Advanced Options” at the bottom of the page.

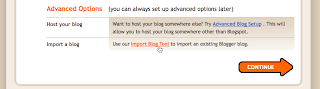
When you import a blog, all of the posts will get saved in an “imported” state. From there you can publish just a few, or all of them at once. Here are some ideas for what you can do with importing and exporting:

  • Merge two or more blogs into one. Take the exported posts and comments from one blog and import them into another one.
  • Move individual posts from blog to blog. After importing, select just a set of posts to publish and publish them with one click.
  • Back up your blog to your own storage. You can keep your words safe and under your control in case anything happens to your blog, or with blogger.com, or if you want to remove them from the Internet.
  • Move your blog somewhere else. This export format is standard Atom XML. So it’s good if other blogging providers extend their Atom support to include import and export. And, if you decide to come back to Blogger, importing your export file will get you back up and running in seconds.

Caveats

  • The export format currently only covers blog posts and comments to those posts, not blog settings or templates. To back up a Classic template, copy and paste the template code from the editor. To back up a Layouts template, use the Backup / Restore template option to download a copy of your template.
  • Before importing a blog for the first time, it is recommended that you create a new, throwaway blog to import into so you get a sense for how the process works. Once you’re comfortable, import into your public blog.

Thursday, June 05, 2008

Publish Post to Any Of Your Blogger Blogs Directly From iGoogle

Good News for all bloggers blogging through blogger.com. Blogger.com announced the launch of draft version of the Blogger Posting Gadget for iGoogle. With this gadget, you can write, save, and publish posts to any of your Blogger blogs directly from iGoogle.

Interested? Try it now: Add to Google

Make sure you’re signed in with the same Google account you use on Blogger in order to start posting.

image

Currently, the gadget supports the following:

  • Editing the HTML of title, body and labels
  • A drop-down menu to select from multiple blogs (if you have them)
  • The ability to publish a post immediately, or save it back to Blogger as a draft post

Tip: If you start writing a post in HTML and decide that you want image uploading or other rich text features, just click “Save Draft.” The gadget will save the post, then give you a link to directly edit the post in Blogger.
Some compatibility notes:

  • The Blogger posting gadget will only work in iGoogle, not in other gadget containers, because it requires authenticating with your google.com cookie. This restriction will be removed in the future.
  • Since this gadget uses the JavaScript Google Data API for Blogger, it does not work in Apple’s Safari browser. This will be fixed in the future as well.

Saturday, February 16, 2008

Scheduled Posts : New Feature for Blogspot Users

image Sometimes you may come across situations where you want to publish your blog post in future. You’d like to write a post now and have it automatically published at some time in the future. Blogger in draft introduced a new feature that will help you to do so.

image

Publishing a post in the future is pretty simple: in the post editor, reveal the Date and Time fields using the “Post Options” toggle and enter a post date and time that is in the future. When you then click the “Publish” button, your post will become “scheduled.” When the date and time of the post arrive, your post will be automatically published to your blog.

Your scheduled posts appear in your Edit Posts list alongside your drafts and published posts. To un-schedule a post, simply save it as a draft any time before it gets published.

Remember: Scheduled Posts only work when you’ve logged in to http://draft.blogger.com/.

Friday, January 18, 2008

Blogger as OpenID provider, More Support

Team at Blogger.com has been working on making Blogger an OpenID provider. Latest release of Blogger in Draft is all about that. You can now use your blog’s URL as an OpenID URL on any website that accepts OpenID 1.1 authentication.To enable OpenID for your blogs, just edit your profile on draft.blogger.com and enable the checkbox which says Enable OpenID for Blogs and you are all set!

After checking this box, you can use the URL of any of the blogs you are an admin of as an OpenID identity. When you use it to log in to another site, you will be taken back to Blogger where you can confirm that Blogger can tell the site that you own the domain.

You can find more information about OpenID and how it works at OpenID.net.

We hope you’ll try out using your blog as your OpenID identity around the web. Let us know how it goes in the comments! If you’re looking for things to do, take a look at MyOpenID’s OpenID Site Directory for OpenID-enabled sites.

Since this feature is still in draft, there are a few caveats:

1. OpenID for blogs is currently not supported for that aren’t hosted on Blog*Spot or a custom domain, such as FTP blogs. However, the OpenID web site has a help page that explains how to workaround this limitation by delegating your FTP blog to a Blogger-hosted blog.

2. If you say “Yes, Always” to trust an OpenID site forever, you cannot now delete that trust. This feature will be added soon. :)

A Whole New Direction for Blogger With the Addition of Three New Languages

Blogger is now available in three more languages: Arabic, Hebrew, and Persian!

image

With the addition of these 3 languages, Blogger is now available in 40 languages. It's really difficult job to add these 3 languages, because Arabic, Persian, and Hebrew are written from right to left. As you can see from the above screenshot, team had to flip the whole interface around.

Besides localizing the Blogger interface into these three languages, we have now right-to-left templates and have new toolbar buttons for bi-directional text editing in the post editor.

Changing your language preferences and settings

To see the Blogger interface in one of these languages, just use the menu on your Dashboard. You can also choose your imagelanguage on Blogger’s homepage and via the “Language” link in the footer of most pages.

From then on, all new blogs you create will default to using your new language choice.

If you need to change the language of an existing blog, just go to Settings > Formatting and select a new language there. Your blog language affects date formatting and other blog text, and your blog’s comments form as well.

Right-to-left templates

For Arabic, Persian, and Hebrew blogs, we will also rearrange your template to read more logically from right to left. So, a blog that once looked like this:

image

will now look like this:

image

Please note that your template won’t change if you’ve customized it with Edit HTML. Also, if you’re still using a Classic template you will have to upgrade to Layouts in order to take advantage of bidirectional language templates. Learn how.

Bidirectional text editing

Right-to-left and left-to-right buttons are added to Blogger’s post editor. They’ll appear if your Dashboard language or your blog’s language setting is for a right-to-left language.

image

Clicking on these buttons will set the paragraph you are currently editing to either right-to-left or left-to-right mode. This way you can write truly bidirectional posts.