Blogger in Draft, a draft version of blogger.com, has released lots of new features yesterday that will surely rock your blog. Below is a list of all new features that they released.
1. Star Rating
With this new Star Ratings feature, your readers  can easily rate your posts — or the things you post about — from one star to five stars with a single click, right from the post footer.
Think of Star Ratings as a mini-poll for each of your posts. If you blog about fashion, food, crafts, quotes, or art, this will be particularly useful to you.
To enable Star Ratings, log it to http://draft.blogger.com/ and go to your Layouts page. From there, click the “Edit” link for the Blog Posts page element and then check the “Show Star Ratings” checkbox.

You can customize the location of the stars within the post by dragging the preview around in the “Arrange Items” box.
Notes
- This is a Layouts-only feature. If you’re using a Classic template you’ll need to upgrade to Layouts to add Star Ratings.
- The star ratings widget should blend seamlessly with most solid-colored blog backgrounds (one exception is Rounders, where the edges of the widget will be visible via a color change). The text and background colors for the ratings are taken from the following skin variables:
- Foreground: textcolor, textColor
- Backrgound: mainBgColor, bgcolor
-
- If you have customized your blog widget’s template you may not see the Star Ratings. You will need to either reset your blog widget’s template or copy the Star Ratings code from a fresh template.
2. Webmaster Tools for Blogger
Ever wonder why your blog shows up where it does in the Google search rankings? With this new Webmaster Tools integration that information is just a click or two away.
Webmaster Tools is a Google service that provides you with detailed information about your website’s visibility to Google’s search engine. You can see how often Google’s web crawlers visit your site, find out who links to your site, what searches are used to find your site, and even control how your page appears in the Google web results.
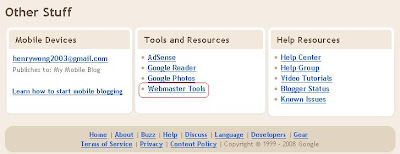
You will find a new link from the Blogger in Draft dashboard to take you directly to Webmaster Tools. If you follow it, blogger.com will automatically add all your blogs to Webmaster Tools and verify them for you. From there, you can poke around and learn about how Google search sees your blog.
You can learn more about Webmaster Tools at Google’s Webmaster Help Center.
3. Embedded Comment Form
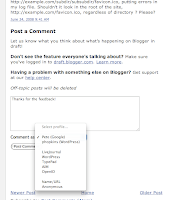
Many of us don’t like the existing comment form as  it’s on a separate page from the post, styled in a way that doesn’t match the blog. Well, this new embedded comment form addresses that by putting the comment form where your readers expect it: at the bottom of the post.
To turn on the embedded comment form, log in to http://draft.blogger.com/ and go to Settings > Comments for your blog. You’ll see that the “Show comments in a popup window?” setting has been replaced with the new “Comment Form Placement” setting. Just click “Embedded below post,” save your settings, and go check out a post to see your new comment form.
Additional Features
- The comment form works with Google Accounts, OpenID authentication, name / URL, and anonymous identities. As with the current comment form, they’ve set up shortcuts for a handful of common OpenID providers.
- Once you log in with a Google Account for one blog, you won’t have to log in to comment on other blogs during your browser session. Nevertheless, to protect your privacy, it uses an <iframe> to keep your logged-in identity inaccessible to the blog itself.
- If you have a “Comment Form Message” set up, it will be put on the post page above the comment form.
- If you require word verification for commenting on your blog, it will show the word verification form in a small dialog after you click “Post Comment.”
- The embedded comment form works with Classic templates. The <$BlogItemCreate$> tag will add the right HTML to your page.
Caveats
- If you’ve edited your template for the blog widget, you won’t automatically pick up the new code for the comment form. You’ll need to either reset the template by deleting the contents of the <b:widget id='Blog1' locked='true' title='Blog Posts' type='Blog'> element (backup your template first!) or copy the code from an unmodified blog. Amanda from Blogger Buster has written a howto post for updating a modified blog widget template.
- The font color of the comment form is currently hard-coded to black. If your template has a dark background, this may make the “Comment As:” label hard to read.
- The embedded comment form currently does not support subscribing to follow-up comments via email, nor does it have a preview button.
4. New Post Editor
This is a completely new version of the Blogger post editor. This editor is more stable, compatible, predictable, and will help to bring more functionality to posts on Blogger over the coming months and years.
Out of the gate you’ll notice two areas where the new editor improves significantly over Blogger’s current editor: images and raw HTML.
Note: Autosave is currently disabled in the new post editor. It will be turned on in an upcoming release, but for now it’s off. You’ll want to periodically remember to save your drafts when using this editor.
More details about this feature is available here.
5. Import and Export
Now you can export all of your posts and comments into a single, Atom-formatted XML file for easy backup. You can then import the posts back into Blogger, either into an existing blog or into a new one.
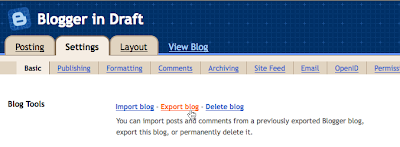
To export your blog, log in to http://draft.blogger.com/ and go to the Settings > Basic page. You’ll see the Blog Tools links at the top of the page for importing and exporting.
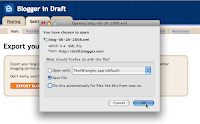
Once you click “Export blog” and press the “Export” button on the  next page, your browser will prompt you to save the XML file for your blog. Keep it somewhere safe as a backup, or import it into a different blog. You can import one blog into another from the Blog Tools links, or when creating a new blog. Look for the “Advanced Options” at the bottom of the page.
When you import a blog, all of the posts will get saved in an “imported” state. From there you can publish just a few, or all of them at once. Here are some ideas for what you can do with importing and exporting:
- Merge two or more blogs into one. Take the exported posts and comments from one blog and import them into another one.
- Move individual posts from blog to blog. After importing, select just a set of posts to publish and publish them with one click.
- Back up your blog to your own storage. You can keep your words safe and under your control in case anything happens to your blog, or with blogger.com, or if you want to remove them from the Internet.
- Move your blog somewhere else. This export format is standard Atom XML. So it’s good if other blogging providers extend their Atom support to include import and export. And, if you decide to come back to Blogger, importing your export file will get you back up and running in seconds.
Caveats
- The export format currently only covers blog posts and comments to those posts, not blog settings or templates. To back up a Classic template, copy and paste the template code from the editor. To back up a Layouts template, use the Backup / Restore template option to download a copy of your template.
- Before importing a blog for the first time, it is recommended that you create a new, throwaway blog to import into so you get a sense for how the process works. Once you’re comfortable, import into your public blog.


No comments:
Post a Comment